INTRODUCTION:
Active Directory Federation Service (ADFS) is a component introduced by Microsoft in server operating system to provide federation and single-sign on as a service which helps an organization to connect with different partners applications in a secured manner. In simple terms, AD FS allows an organization to provide facility to the users to login into multiple applications with one-time login.
Certificate plays an important factor in terms of AD FS Service. It is the key which provides a connection to get the users into the necessary data in a much secured way restricting the unauthorized access to it. AD FS uses both public and “self-signed” certificates.
This article provides information on different types of certificates used in AD FS and also methods to renew the SSL certificate.
ADFS CERTIFICATES:
Before explaining on the types of certificates being used, let us see a short note on the keys being used on the certificates for the security purpose.
- Public Key – Key which is available to any application that requests for communication to encrypt the messages.
- Private Key – Secret key which is known only to the users who are involved in the communication.
- Session Key – Combination of public and private key data to establish the communication
There are majorly three certificates being used by AD FS for Single-Sign on
- Service Communications/SSL Communications:
As the name implies, this certificate is the one which is responsible for encrypting the connectivity of client to AD FS Servers. It encrypts all the data between client and AD FS Servers which is being parsed for establishing the connection to the application. (Username, password)
- Token-Signing
Certificate which signs all the security tokens that AD FS produces so that the resources (Web Server) verifies and identifies the token being transmitted are from the authorized AD FS.
- Token-Decryption
AD FS uses the token decryption certify to decrypt the security token with the private key for communicating with the claim providers.
Among the above mentioned certificates Token-signing and Token-Decryption are self-signed by default wherein secure communication is public.
PRE-REQUISITES:
We will further see how to renew different AD FS Certificates with a lab setup explained. Please make sure you have the following prerequisites checked before proceeding with the certificate renewal.
- AD FS Infrastructure architecture (Primary Secondary details of ADFS Servers)
- New Certificate from the Certificate Authority
- Permissions available for the current certificates
Note: This document contains information only on AD FS 3.0 version.
LAB SETUP EXPLAINED
Following is the architecture of the lab setup in which we are going to perform the SSL renewal activity.
| Server Name | IP Address | Role |
| TSTADFS01 | 192.0.0.6 | Primary ADFS Server |
| TSTADFS02 | 192.0.0.7 | Secondary ADFS Server |
| ADFSWAP01 | 192.0.0.4 | ADFS Proxy Server |
| ADFSWAP02 | 192.0.0.5 | ADFS Proxy Server |
| TSTLB01 | 192.0.0.1 | Load Balancer Node 1 |
| TSTLB02 | 192.0.0.2 | Load Balancer Node 2 |
| Adfs.test.com | 192.0.0.3 | VIP for ADFS |
In this lab setup, ADFS 3.0 is been deployed as a farm and in total the farm has four servers, two backend or main ADFS servers and two WAP or proxy servers for public or internet access.
For redundancy, both ADFS and ADFS proxy servers are being paired. In addition to this the
External traffic is being routed through the load balancer.

Application configuration
- On the ADFS servers, the ADFS Role will be installed.
- On the ADFS Proxy servers, the Web Application Proxy will be installed.
- On All servers, KB2919355, which is a major update for WS2012R2, adds the new capability for alternate login ID will be installed
SSL CERTIFICATE RENEWAL – PROCEDURE:
As mentioned earlier, Service communication certificates are public and it is been published by trusted Certificate Authority. Since our lab environment contains more than one AD FS Server, we will perform the following steps only on primary server since the changes will get replicated to other servers in the farm.
Renewal with same private key
In order to renew the certificate with same private key, we need to retrieve the current private key from the SSL certificate.
To retrieve the private key, use the following steps.
- Install OpenSSL on the server where you will be performing the renewal process.
- Click Start, Run prompt and type in “exe”
- Click File and select “Add/Remove snap-in”
- Select Certificates, Select “Computer account”, then “This Computer”, Click “Add” and then “OK”
- In the Personal Container, right click the old SSL certificate, Select “All Tasks” and then “Export”
- Export with the option “Include all certificates path if possible” and “Export all extended properties”. Provide the name as “Privatekey” and export it.

Note: If “Yes, export the private key” option is disabled then you cannot renew the certificate with the same private key since the certificate authority has generated the certificate with the option “non-exportable”. Hence you need to further check with CA to resolve it.
- Run the following command to export the private key from the certificate file(.pfx)
Openssl pkcs12 –in Privatekey.pfx –nocerts –out pkey.pem
- Make sure you have new certificate, exported private key file and OpenSSL installed. Run the following command to create a new certificate file with the private key and new certificate
Openssl pkcs12 –export –in new.crt –inkey pkey.pem –out newsslcert.pfx
- Import the newly created certificate file to the Computer accounts personal container with the option “Mark this key as exportable. This will allow you to back up or transport your keys at a later time” and “Include all extended properties” selected.
Remaining steps to set the new certificate for AD FS will be explained in the next section. (Refer steps (ii) to (vii))
Renewal with new private key
(i)Import new certificate in ADFS Primary Server
- Click Start, Run prompt and type in “mmc.exe”
- Click File and select “Add/Remove snap-in”
- Select “Certificates”, Select ”Computer account”, then ”This Computer”, Click “Add “ and then “OK”
- In the Personal Container, import your new certificate.
(ii)Set permissions for the new certificate
- In Certificates console, Right click the new certificate, Select “All tasks” and then “Manage Private keys”
- Add Read access to the service accounts which is being used to run the AD FS Service
(iii)Set new Certificate in AD FS
- Open AD FS Management console, Expand Services and select Certificates
- Select the new certificate and click “Set service Communications Certificate” in the action pane
- You will be presented with a list of certificates that are valid for Service Communications. If you find that your new certificate is not being presented in the list, you need to go back and make sure that the certificate is in the local computer Personal store with private key.
(iv)Restart the Active Directory Federation services
- Open Powershell as administrator and run the following command
Restart-Service adfssrv
(v)Execute Powershell cmdlets to change the configuration file
- To complete the configuration change, run the following commands in Powershell
Get-AdfssslCertificate
(Make a note of the thumbprint of the new certificate)
Set-AdfsSslCertificate –Thumbprint <Thumbprintofnewcertificate>
(vi)Restart the Active Directory Federation services
- Open Powershell as administrator and run the following command
Restart-Service adfssrv
(vii)Update Certificate in WAP Server
- Import the new certificate to the server as in step 1 to 4
- Run the following commands(in Powershell) in AD FS WAP proxy Server
Get-WebapplicationProxyApplication
(Make a note of the thumbprint of th(e new certificate)
Set-WebApplicationProxySslCedrtificate –Thumbprint <Thumbprintofnewcertificate>
- All of your publishing rules defined in the WAP need to be updated with the thumbprint of the new certificate. Use Powershell for updating them with the new thumbprint. Run the following command
Get-WebApplicationProxyApplication –Name “WebAppPublishingRuleName” | Set-WebApplicationProxyApplication –ExternalCertificateThumbprint “<Thumbprintofyourcertificate>”
- Restart the Web Application Proxy services to complete the configuration
TOKEN-SIGNING & TOKEN-DECRYPTING RENEWAL
Since Token-signing and token-decrypting are self-signed, by default the certification lifetime is set to 365 days.
Verify the settings in your AD FS configuration which is required for the renewal by running the following command
Get-ADFSProperties
This command will display all the configuration properties of ADFS among which we require the information of only the following properties
AutoCertificateRollover
- CertificateDuration
- CertificateGenerationThreshold
- CertificatePromotionThreshold
- CertificateRolloverInterval
These properties help us to find whether the ADFS is set to automatically manage the certificate renewal and expiry process
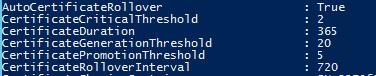
As per the above settings,
- ADFS will be aware that the certificates will be expiring within 20 days
- Creates new certificates valid for 365 days and set the new certificates as secondary certificate
- After 5 days updates the new certificate as primary.
If the AutoCertificateRollover property is set to false, we need to manually rollover the certificates.
Note: AD FS service outage incurred when the Token-Decrypting or Token-Signing certificates are updated because the relaying parties must update their configuration to expect the new certificates.
Run the following command to force the AD FS to generate the new certificates and promote them as primaries immediately
Update-ADFSCertificate –CertificateType “Token-Signing” –Urgent
Update-ADFSCertificate –CertificateType “Token-Decrypting” –Urgent
Other simplest way would be to extend the “CertificateDuration” Property with the following command.
Set-ADFSProperties -CertificateDuration <Numberofdaystoextend> -AutoCertificateRollover $true
Example: Set-ADFSProperties -CertificateDuration 1825 -AutoCertificateRollover $true
This command will set the certificates to last for 5 years
